Manual: Cleaning 4xxx
Cleaning the 4xxx Roomba
I would strongly suggest doing these steps after every cleaning. Hopefully by using this as a Guide, you will get many, MANY productive years out of your robot.
Step 1: Empty out the Dust bin. iRobot says to empty it out every 3 cleanings. That is preference, and it all depends on how dirty the floor gets between cleanings. I myself, empty the Dust bin after EVERY cleaning. 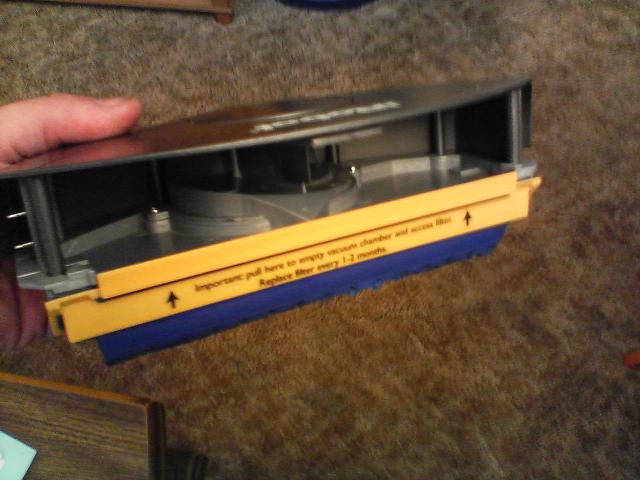
Step 2: Clean the Air filter! If you don’t clean the air filter after EVERY cleaning, the vacuum motor will be under a heavy load, which in turn will take valuable minutes away from it cleaning, AND the motor will not last a long time!! 
Step 3: Remove the Beater bar, and Brush bar from the Roomba, and take off the black “Caps”, and clear away ANY hair that is wound up on both ends! Also, take off the Yellow “Bushings” and check to make sure they are free and clear of any debris! If you don’t do this step, this will put a heavy load on the brush motor, and gears, which could melt the plastic!! Some people have had this done!! 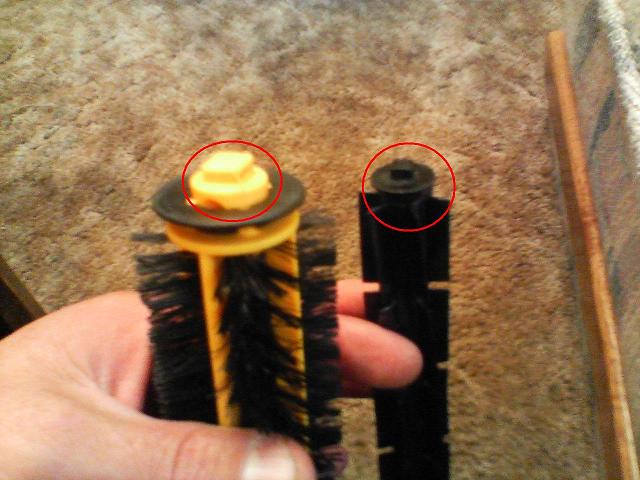
Step 4: Dust off the Vacuum deck, with the Dirt Sensor, either by a painter’s brush, or compressed air. Make sure to wipe down the deck with either a sponge that is moistened with a little bit of water, or use some cleaning wipes, which I do. Pay attention in cleaning the Dirt Sensor well, or it won’t be able to sense dirt!! 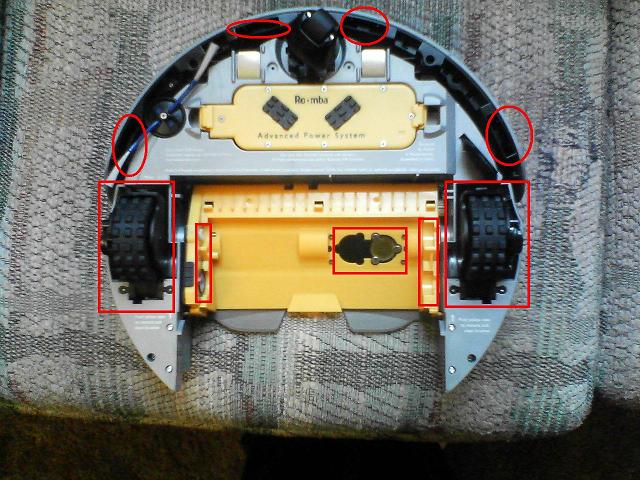
ADDED: Take off the Spinning brush after EVERY cleaning IF you have pet(s)!! Hair gets under there, and will stop the motor, and decrease the life. Be VERY careful, cause I have heard that you can strip the screw easily..
Step 5: Either use a can of compressed Air, or a small vacuum to clean the Roomba body. I use the compressed air to blow out all of the dust bunnies out of the Cliff Sensors, wall-following sensor, drive wheels, between the roomba body, and the vacuum deck. Pretty much where there is an opening, I will use the can of air. Some people say it’s bad. Either way, dust WILL form in places of the Roomba where you can’t reach!! You will have to disassemble the roomba in certain places to get to them. After I blow the “Bunnies” away, I wipe the whole Roomba down with the Cleaning wipes.
Step 6: I then take the beater and brush bar, air filter, yellow “Bearings”, the black plastic circles, and the Wire guard for a soak in soapy water. I rinse them completely, and allow them to dry before placing back in the Roomba. I personally do this step after every cleaning. It’s up to the user how many times he/she wants to perform this step. Performing this step once a month should be adequate enough.
PARTS ARE COLOR-CODED
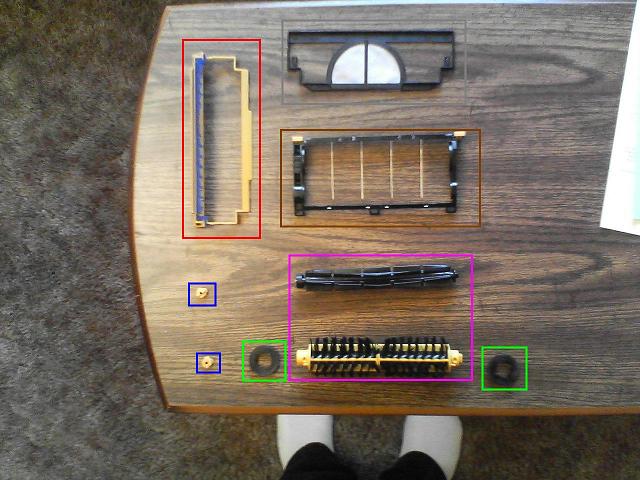
RED: Part of the Air Filter. It “Snaps” to the Air Filter.
GRAY: The Air Filter by itself.
BROWN: The Wire Guard, which holds the Beater and Brush Bar in place.
BLUE: Yellow “Bushings” which fits on one end of the Bars.
GREEN: Black Tabs, which “Snap” onto the Brush Bar to prevent hair from entering the gear housing.
VIOLET: The Beater(TOP), and Brush(BOTTOM) Bars.
- Printer-friendly version
- Login to post comments
Online forum users
Registered users: Bing [Bot], Google [Bot], im1kissfan
Latest News
Latest Reviews
Latest Blogs
- Navibot SR 8855 wrongly reports battery is already charged so it won't charge at all
- Roomba 531 quite sick
- Neato D7 scratched new hw floors
- Botvac 65 software question
- The Most Promising Companies in Robotics
- error on wi fi indicator
- Caveat Emptor - Neato Connect
- Say no to dust, sweeping robots care for your family
- How to replace the battery in the iRobot Roomba
- To Anyone Else Having "Erratic Behavior" with a Neato
Today's Hottest Deals
-
 $399.99$299.99
 -
 $699.99$599.95
Poll
User login
Subscribe to RSS Feed
Show your support